Showing posts with label DIY. Show all posts

Thursday, August 30, 2012

DIY: Tea Bag Nail Wrap

I always like to keep my nails nice and long, but every once in a while I get that terrible rip right in the middle of the nail that ruins it all! So here's a super easy way to seal the deal, if you don't have the time to get a real wrap put on at the nail salon. Yes, it is made with a tea bag. I know, I know, it sounds super weird, but the tea bag material is very similar to actual nail wraps and it works amazingly, I promise.


Photos: Myself

Thursday, August 9, 2012

DIY: Embellished Camo Jacket


Hope everyone's having a wonderful week! Here's a quick DIY I did earlier this week to jazz up any piece of clothing. Here, I chose to use a camoflauge jacket that I found on Ebay. I've been searching high and low for the perfect oversized camo jacket, but I also wanted it to have a little jazz. I bought these vintage looking buttons from Michaels a long time ago and never knew what to do with them. So I thought embellishing my new camo jacket with them would be perfect. Then, I added spikes to the shoulders, in true Olivia style. And voilà, the perfect camo jacket with a little somthin' somethin'. Oh, and it's super easy, doesn't get better than that.

All you need is:
-Whatever piece of clothing you want to embellish
-Buttons, rhinestones or studs as embellishment, anything you want really
-Scissors or pliers
-Toothpicks
-Fabric glue, I found this jewel-it glue by Aleene's works best because it is specifically made for gluing little hard things on to fabric and stand up to multiple washings

So all I did was cut the little pieces sticking out from the back of the buttons, that are meant for sewing. Then I arranged how I wanted them to sit on the collar. I plopped a little glue onto some paper and used the toothpick to put some on the back of the buttons. Glue those babies on and let them sit for a few hours. This glue doesn't set right away, so be careful not to move the pieces around. The spikes I glued on as well, but they do come with screw backs (from studsandspikes.com). So once I figure out a good way to make holes in the fabric, then I'll probably screw them on because the spikes tend to be a little heavy and the glue might not hold up. But after it's dry, you're good to go!


Tuesday, January 31, 2012

DIY: Honestly WTF's Spiked Comb

I've wanted to make this Maison Michel inspired spiked comb for the longest time after I saw it on Honestly WTF, but I ended up using the spikes I bought for another project at school, and so it got pushed back a bit. I finally bought some more spikes and here it is, pretty awesome if you ask me. Thanks Honestly WTF! See the full instructions here.

You'll need:
-liquid super glue
-curved plastic comb, buy it here
-7-9 cone spikes, depending how long your comb is (I used seven 1 inch silver cone spikes from studsandspikes.com

First, glue two spikes on each end of the combs and hold them on until they're dry. I found that blowing on it helped it to dry a lot faster. Then, space out the rest of the spikes to make sure they'll be placed on evenly.

Glue the rest of the spikes, alternating sides. That's it! Put it in a teased out pony, and you're good to go!


Photos: Myself

Happy Anniversary to Adorn Me!! 1 year today :) Thank you for all who follow and support me, it means so much!

Wednesday, January 25, 2012

Animalistic Tee


BIK BOK-ANIMAL TEE
I can't help but notice animal tees and dresses popping up all over the place...and well, it's pretty freaking awesome. I especially love the relaxed look of the first two photos, but really, I can find a shirt exactly like that from a thrift store. I jumped on that real quick and placed my bid on a rad panther tee from Ebay (fingers crossed, although I don't think everyone's running to Ebay for a ridiculous panther tee shirt). I think if when I get the tee I'm going to work a little DIY magic to make it fit just right. Oh, but who could forget Christopher Kane's Spring 2009 Gorilla dresses? I can't, and that's precisely why I'm suddenly infatuated with giant animal heads.

CHRISTOPHER KANE-SPRING 2009

Photos: MAFFASHION, Carolines Mode, Style.com


Monday, January 23, 2012

Spiked Kicks


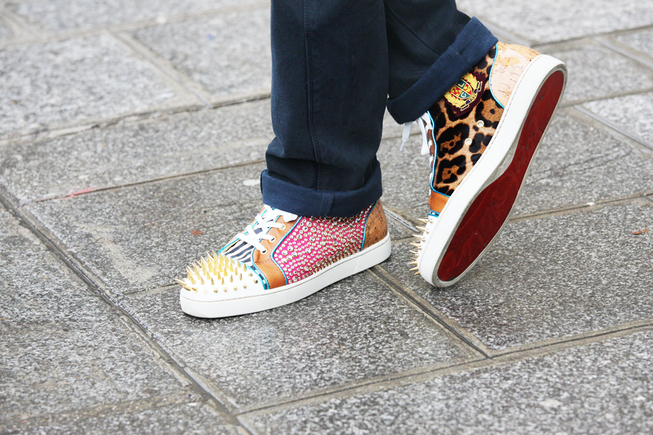
Sweet kicks, love the spikes...do I see a DIY in the future?

Photo: NAM via Grazia.it

Saturday, January 14, 2012

DIY Inspiration: Jewelry Organization

Current looking for new ways to organize my giant collection of necklaces. I thought these vintage inspired frames were a really cute idea to display jewelry, better get thrifting!


Saturday, November 12, 2011

Inspiration: 11.12.11

Photo: Nasty Gal Blog
Slinky bracelet anyone? Bronze or gold would be awesooome.

Friday, September 16, 2011

FNO

Just a tab bit late on this one...Unfortunately I didn't take as many pictures as I wanted to, but I figured I would share the few photos I did take and the little goodies I scooped up while shuffling down Broadway in Soho (SO CROWDED!).
My best girl Amanda
Insane shoes that I saw a girl wearing in American Apparel...she did them herself!
Urban Decay Naked palette that I've been dying to get

Yup, I gave in and finally bought the American Apparel leather pouch (only because I got Lauren's discount!)
Jeffrey Campbell Clinic
I didn't buy these at FNO, but for FNO.  I wanted to have them so bad, I ended up buying them twice on Solestruck! The first time I picked standard shipping and they weren't going to be delivered in time.  Second time I picked express and they were scheduled to come the day before, BUT I missed UPS while I was at work!  And so, I finally received these amazing shoes the day of only for them to rip my feet up all night (whoever said these were comfortable in the reviews are out of their minds).

Photos: Me

Tuesday, September 6, 2011

DIY: Assorted Bracelets

What to do on a rainy day?  Make bracelets of course!  I ordered these skull beads from Etsy a while ago and finally decided to just add them to a couple beaded bracelets I already had.  I simply cut the bracelet and restrung them with the skull bead, that easy!  The washer bracelet is just a whole lot of washers that I bought from Home Depot and strung on some stretchy string.  The spikey things (not sure what they are) are also from Home Depot, strung on leather cord.  Then I wrapped some neon cord on the ends so the spikeys don't move around. TADA!
  ©Olivia Joel- 2011

Sunday, June 26, 2011

DIY: Nutty Bracelet

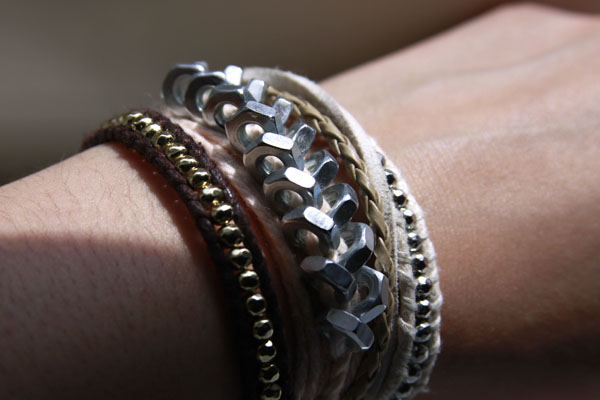
I've recently discovered the blog called Honestly, WTF, which has tons of awesome (and easy) DIY tutorials.  I fell in love with the simple braided hex nut bracelet.  All you need is 16 (or more) small hex nuts (Home Depot!) and some cotton twine, or I used yarn.
-Cut 3 one yard pieces of the string and tie them together leaving about 2 inches of string above the knot
-Next, braid the string for about an inch or two
-Then, you start to braid in the hex nuts (this is a little tricky) before you move the left string over the center one, thread a nut on the left string, cross it over, thread a nut on the right string, cross it over...and so on
-Once all of the nuts are braided in, just finish with another inch or two of regular braiding, tie another knot AND YOUR DONE! :)

Now you can wrap it around your wrist a couple of times and pair it some other bracelets to make a super cool arm party.


Decided to include Kiki in some photos because she is just so damn cute


:)
© Olivia Joel- 2011

Monday, June 13, 2011

DIY: Reconstructed Old Purse

Remember that American Apparel leather carry-all pouch I showed you while ago?  While I still am eager to buy one, I know in the back of my mind a simple leather pouch with a zipper is so not worth the $50-$60 they're asking for it.  I was set on making my own from some faux leather and zipper I bought online...and failed miserably.  It seems so simple (and it is) but I don't have a real sewing machine, just a little hand held one that doesn't sew through leather very well.  So...I had the genius idea of grabbing one of my old purses that I never use anymore, and reconstructing that into my very own cotton carry-all pouch.  What's even better is that the zipper is already on the bag, all I had to do was flip it inside out and sew it into a rectangle shape and VOILÁ!  A printed, not plain, pouch clutch!
Here are some before and after photos:
I loved the print of this purse and it already had a zipper...so this was the perfect purse to use

First, I cut off the straps

This odd half circle shape didn't work well, so I turned it inside out and sewed it into a smaller rectangle shape

And now it looks like this!

TADA!